How to install Moneylink?

Moneylink is an irreplaceable tool for those who manage content sites. Its main function is to turn all the regular links on the website into affiliate ones, so all the orders placed by users that followed those links are attributed to the publisher who owns the site.
If you own WordPress-based forum, blog of any other content website now it’s time to monetize it. Moneylink will be particularly useful for websites with lots of content (especially if users generate it leaving comments or writing they own articles or reviews) — this tool will automatically replace all the links with affiliate links (even if they were standard links before you joined an affiliate network). That even includes links that were not placed on the site by you (e.g. links that were left by users on a forum or in a blog’s comment section).
One of the main features of Moneylink is that it is not only connected to Admitad but to 60 other affiliate networks all over the world. That makes this tool universal and suitable for pretty much any location and language, and it automatically connects the publisher to over 60, 000 affiliate programs. If a certain advertiser has stopped working with one affiliate network but their program is still available in another one, your traffic will be automatically redirected to the active affiliate program and, therefore, won’t be wasted on the program that has been suspended. Another considerable advantage is that adding Moneylink to the code of your website will not influence its position in search results or your SEO settings in any way.
Let’s figure out how to install Moneylink on your site. The entire process consists of two steps: retrieving a piece of code from the Admitad system and inserting it into the code of your site.
Today we’ll fing out:
- How to add you website as an Ad Space
- How to create Moneylink code
- How to place Moneylink on your website
Adding website as an Ad Space
First, in order to let the system generate a Moneylink code for you, you need to add your site as an ad space in the Admitad system. You can either do that during the sign-up process (if you’re just joining Admitad as a publisher) or at any point when you are logged into your account. If you are joining the network for the first time, you’ll need to add your site as an ad space during the registration process.
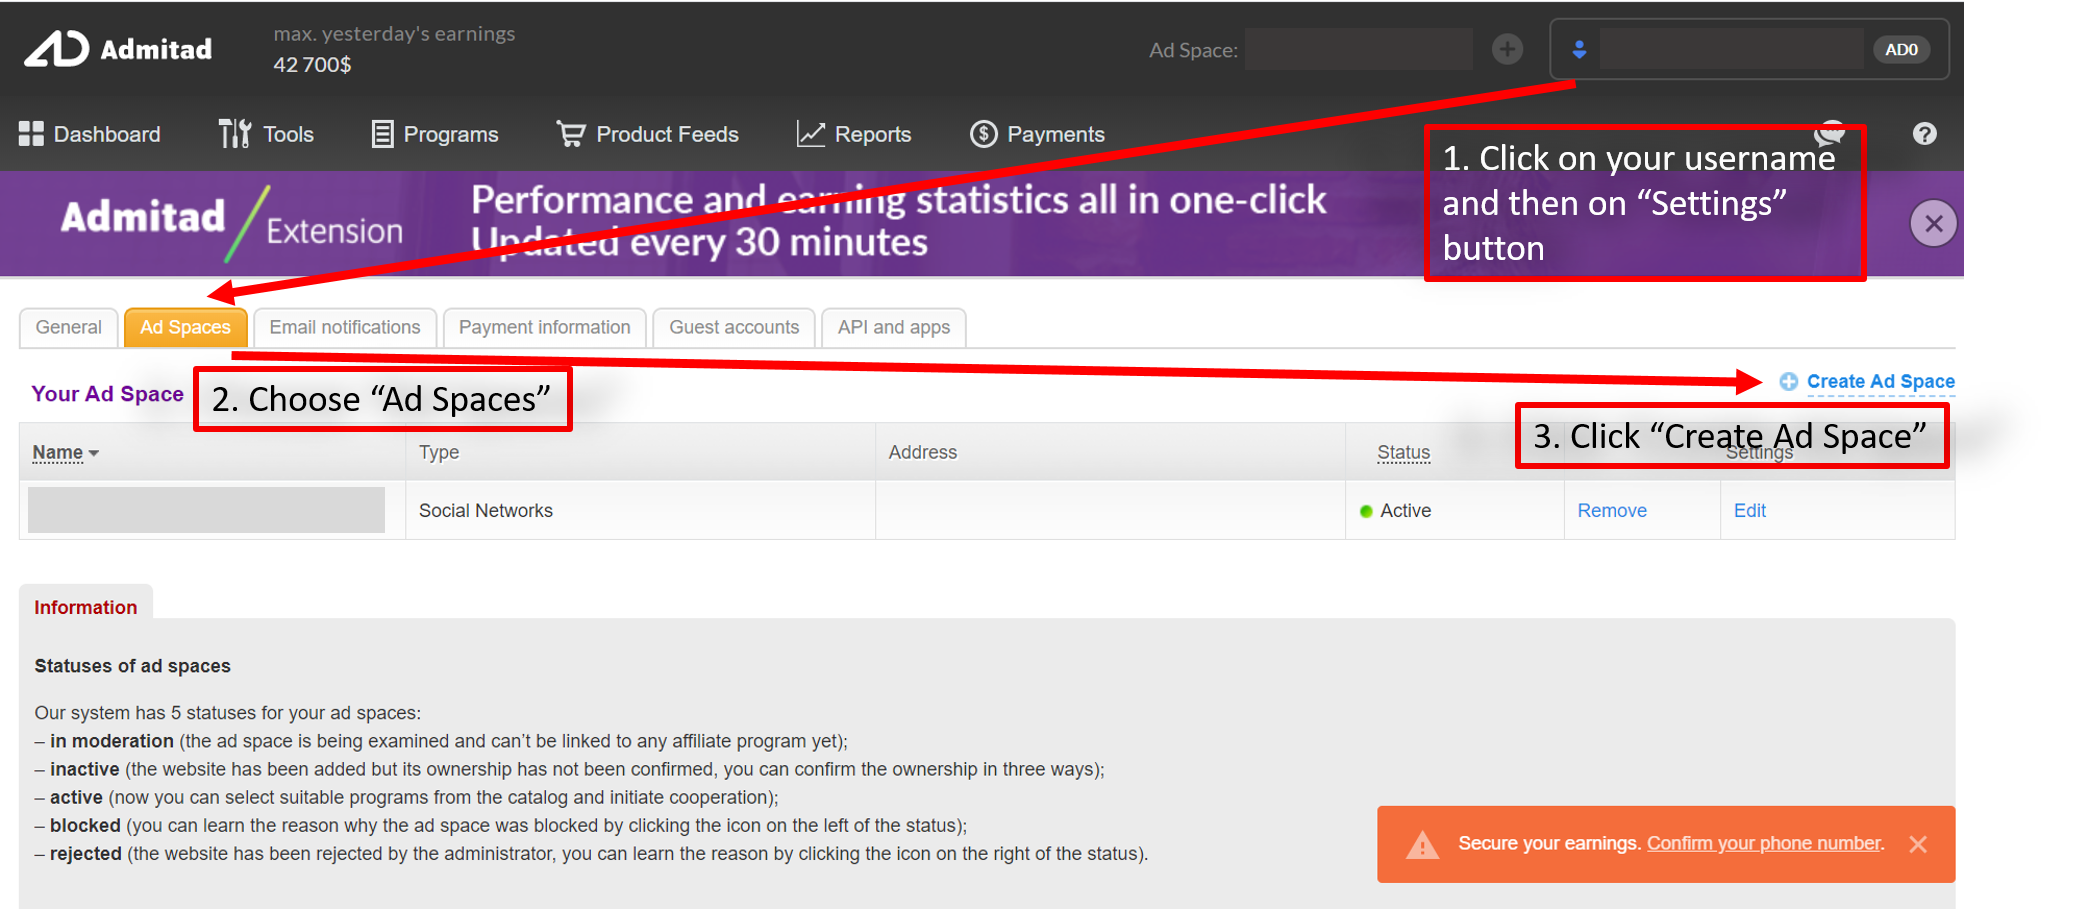
If you have previously registered another ad space, follow these instructions to add a new one:
…or just click the “+” button in the top right corner in your personal account.
Choose one or several countries you are planning to work with (that is normally defined by the languages of your ad space), and the categories of affiliate programs you are interested in. In the “Category” section select the type of programs you’d like to work with.
When you are adding a new ad space, you need to choose its type — pick one or several options. Add a link to your website in the “Link to resource” field and set a website name. Keep in mind that the name will be used in the system reports, so in case you have more than one blog, it is better to save all of them under different names.
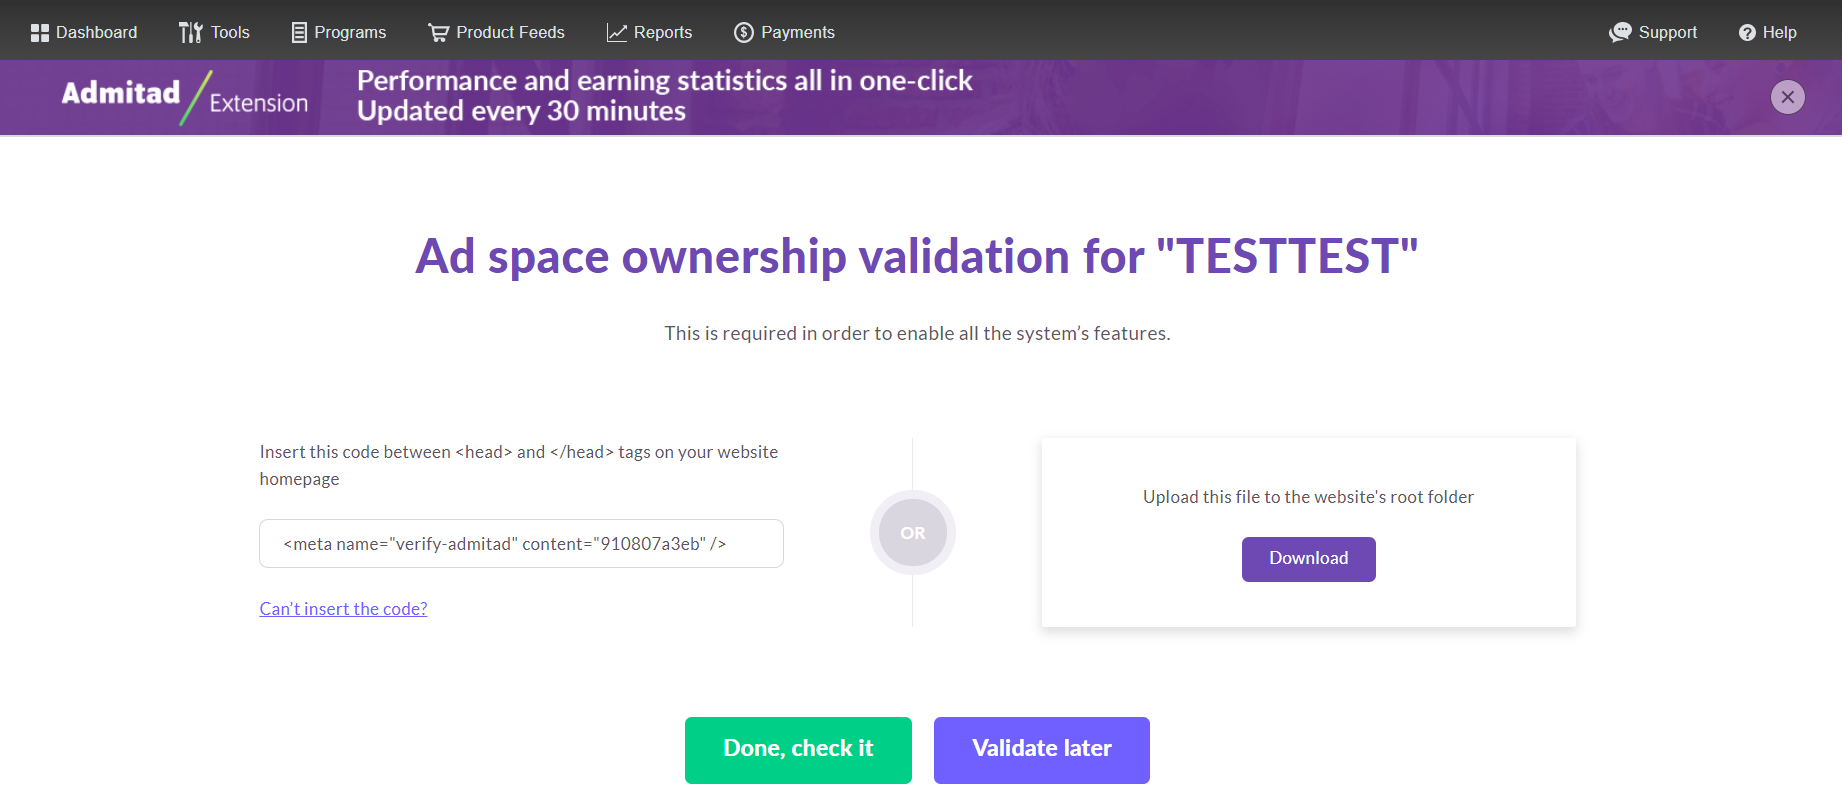
After all you will have to validate your website.
To prove that it is your website you should add special code between <heah> and </head> tags. If we are talking about WordPress website you must choose “Editor” in the “Appearance” menu. You will see a list of all the themes used on the site. In the right column with the list of fi les, find “Header” and edit it (find <heah> and </head> tags, paste the code between them and click “Update File”). Other options are to use special plugins (like “Head, Footer and Post Injections” or “Code Snippets”) or download special file to the website’s root folder. After that you push the button “Done, check it” and validate your website.
Create Moneylink code
Next step is to activate Moneylink:
Read the description and click the “Monetize links” button. Now you can start generating Moneylink for your site.
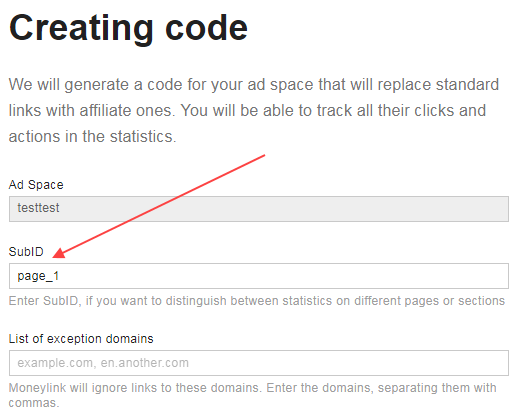
You will be redirected to the “Creating code” page where you can choose the settings and generate the code for placing it on your website. Let’s have a look at each field separately:
1. Ad Space. Here you need to choose one of the ad spaces that you have previously added into the Admitad system. If you only have one ad space that belongs to the “Website” type, it will be chosen automatically
For each website you can create only one Moneylink, but if you need to filter statistics of the different pages or sections, use SubID
2. SubID. A parameter (same as utm) that will help you monitor statistics on clicks and actions from particular pages.
3. List of exception domains. Links on these domains will not be replaced by affiliate links. For example, if you already have an agreement with a certain store about cooperation on special terms (and you have a special project dedicated to this store) you should include this store’s domain into the list of exception domains.
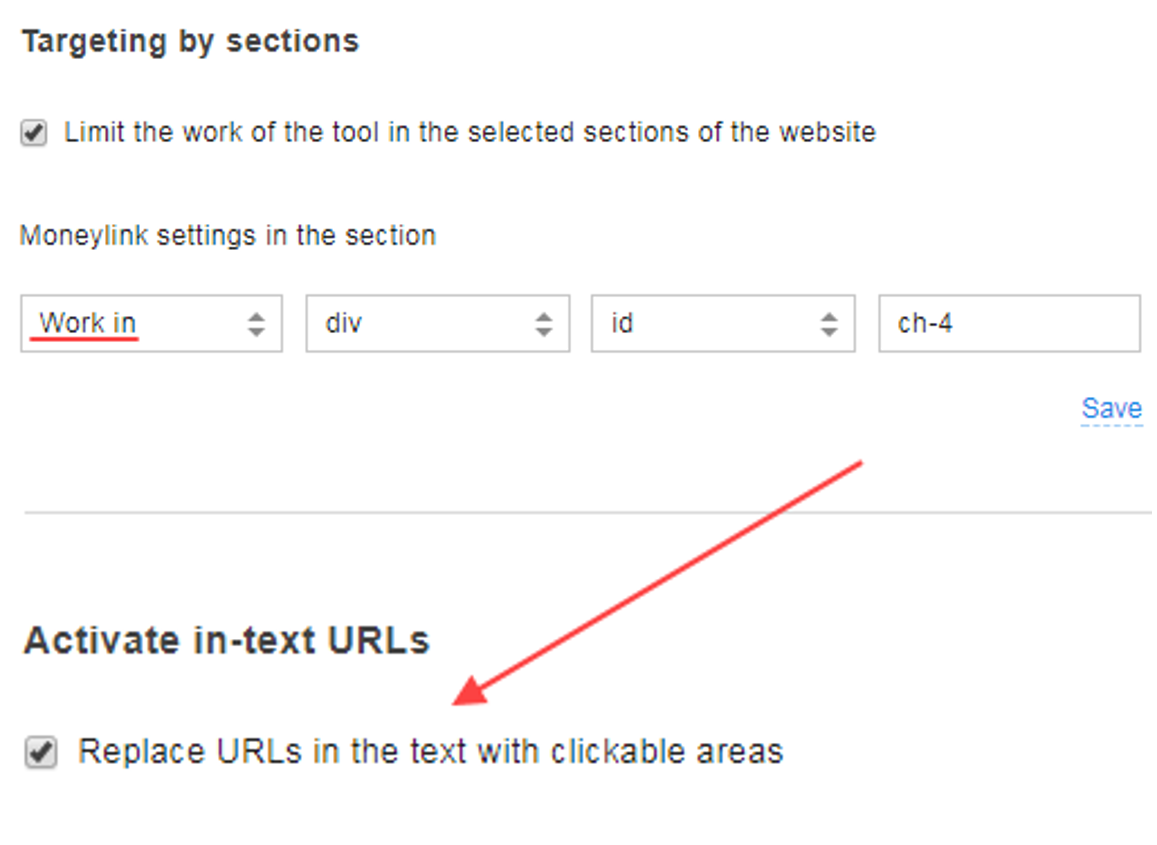
4. Targeting by sections. Here you can specify which site sections should (or should not) be processed by Moneylink.
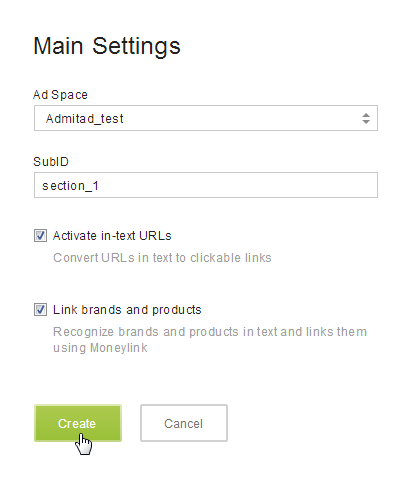
5. Activate in-text URLs. If this function is enabled, all non-clickable links will be turned into clickable ones: e.g. from admitad.com into admitad.com.
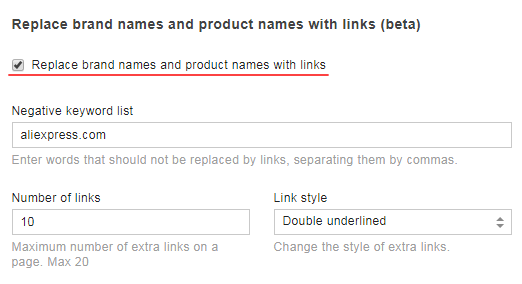
6. Replace brand names and product names with links*. I f you enable “Replace brand names and product names with links” option, Moneylink will recognize brand names and product names in the text. It will turn them into clickable links and convert into affiliate links when they are clicked.
*This option is currently in the beta testing stage and might not be available.
If necessary, you can add brand names that remain in the text form to the negative keyword list. After completing the setup click “Create”.

You will be taken to the page with a list of ad spaces Moneylink has been created for. Click the <> (Link) icon in the “Tools” column.
After you’ve clicked the icon, you’ll see the code you need to copy to insert it onto your site.
The code status will be indicated as “Testing” until it has been implemented in the site code and audited. In the next chapter, you’ll learn where to place this code.
How to place Moneylink on website
To be able to add the Moneylink code on your site, you need to place it between <head> and </head> tags on all (or some) pages. Here is how you do that:
- Click “Appearance” in the left-side panel
- Choose “Editor” in the “Appearance” menu. You will see a list of all the themes used on the site. In the right column with the list of files, find “Header” and edit it.
- Find the start tag <head> and end tag </head>. You can do it using Ctrl+F command
- Paste the piece of code that you’ve copied from the Admitad system anywhere between those two tags and click “Update File.”
Also you can use plugins such as “Head, Footer and Post Injections” or “Code Snippets”. After this, it will take the system a few days to audit the code. The quality of content and traffic coming from your site will also be monitored. Only after the audit has been completed, and the code approved by Admitad, tracking will be activated and the status of Moneylink on your ad space will become “Active.”
It is important to understand that ad spaces integrated with Moneylink do not get checked by each advertiser separately; the audit is executed by Admitad, and once the site has been approved, it connects to all the affiliate programs automatically. Therefore, the requirements to your website will be very high. Do not attempt to activate Moneylink before you set up your site properly, fill it with content, and start generating traffic. You can find more information about Moneylink tool in our help center.








Thank you so much for this useful Information